
Installing a backup camera system is one of the most practical upgrades for modern vehicles. As parking spaces grow tighter and visibility challenges increase, a well-installed backup camera transforms reversing into a controlled, confident maneuver. We focus on clarity, precision, and reliability, ensuring every step delivers a clean installation that performs consistently over time.
This guide walks through a complete installation process, from preparation to final calibration, while reflecting best practices used in professional-grade systems.
Understanding the Role of a Backup Camera System
A backup camera system captures a real-time view behind the vehicle and displays it on a dedicated monitor or factory screen. When installed correctly, the camera activates instantly when reverse gear is engaged, presenting a clear and undistorted image.
Modern systems go beyond a single rear view. Many drivers now choose multi-camera or surround-view solutions for full coverage, especially in urban driving and tight parking environments. A properly installed system improves safety, reduces blind spots, and protects against low-speed collisions.
Choosing the Right Backup Camera for Your Car
Selecting the correct camera determines installation success and long-term performance. Vehicle type, mounting location, and display compatibility all influence the decision.
Important factors to consider include:
- Camera resolution and field of view
- Weatherproof and vibration-resistant housing
- Monitor size and mounting style
- Wired or wireless signal preference
- Compatibility with existing vehicle electronics
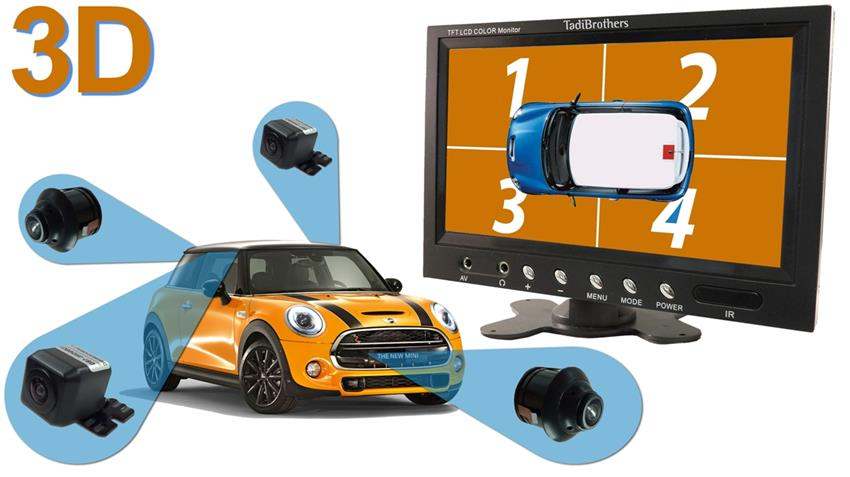
For drivers seeking full perimeter coverage, advanced systems such as the 360 Degree Car Camera System in 3D for Surround View with DVR (V2) provide a seamless bird’s-eye view experience.
Preparing for Installation
Preparation ensures a smooth and professional result. Before beginning, gather all components and verify fitment for your vehicle.
Preparation steps include:
- Identifying the ideal camera mounting point
- Choosing a monitor location with clear visibility
- Inspecting cable routing paths inside the vehicle
- Confirming power source access near the reverse light
- Reviewing installation instructions thoroughly
A clean plan reduces installation time and avoids unnecessary modifications.
Step-by-Step Backup Camera Installation Process

Installing a backup camera involves careful placement, secure wiring, and proper system calibration. Each step must be completed with attention to detail to ensure reliable performance.
Step 1: Mounting the Backup Camera
The camera should be centered at the rear of the vehicle, typically above the license plate or integrated into a trim panel. Mounting height and angle directly impact image accuracy.
Best mounting practices include:
- Ensuring the camera lens is level
- Avoiding obstructions such as bumpers or spare tires
- Using weather-sealed mounting hardware
- Securing the camera against vibration
A stable mount preserves image clarity and prevents long-term damage.
Step 2: Routing the Camera Cable
Cable routing is critical for signal quality and durability. Wires should follow factory pathways whenever possible.
Recommended routing techniques:
- Run cables through factory grommets or rubber seals
- Secure wiring with cable ties away from moving parts
- Avoid sharp edges and heat sources
- Maintain slack for tailgate or trunk movement
Clean routing protects the system and keeps the vehicle interior intact.
Step 3: Connecting to Power
Most backup cameras draw power from the reverse light circuit, ensuring automatic activation when the vehicle is placed in reverse.
Power connection best practices:
- Use a multimeter to confirm voltage
- Connect the camera power lead to the reverse light positive wire
- Ground the system to bare metal
- Insulate all connections properly
Correct power integration prevents flickering and delayed activation.
Step 4: Installing the Monitor
The monitor serves as the driver’s visual reference. It must be positioned for quick, distraction-free viewing.
Common monitor mounting options include:
- Dashboard mount
- Windshield mount
- Rearview mirror replacement
- Factory screen integration
The display should activate instantly and remain visible under all lighting conditions.
Step 5: System Testing and Calibration
Testing ensures the system performs as intended before finalizing the installation.
Testing steps include:
- Engaging reverse gear to verify activation
- Checking image orientation and alignment
- Adjusting brightness, contrast, and guidelines
- Confirming stable video signal
Calibration ensures accurate distance perception and driver confidence.
Avoiding Common Installation Mistakes
Small errors can reduce system effectiveness. Awareness of common mistakes helps avoid rework and performance issues.
Frequent installation errors include:
- Incorrect camera angle causing distorted images
- Poor grounding leading to signal noise
- Loose cable connections
- Monitor placement blocking visibility
- Skipping final system testing
Precision at each stage ensures long-term reliability.
Wired vs Wireless Backup Camera Systems
Both wired and wireless systems offer advantages depending on vehicle type and installation preference.
Wired systems provide consistent signal quality and are ideal for long vehicles.
Wireless systems simplify installation but may experience interference.
For commercial and daily-use vehicles, wired systems are generally preferred for stability and performance.
Upgrading to Multi-Camera and Surround View Systems
Single rear cameras meet basic needs, but many drivers require expanded visibility. Surround view systems integrate multiple cameras to create a composite overhead image.
Benefits of multi-camera systems include:
- Full vehicle perimeter awareness
- Simplified parking in tight spaces
- Improved safety in urban environments
- Enhanced resale value
Professional-grade systems deliver precise image stitching and real-time display accuracy.
Installation for Commercial and Specialty Vehicles
Commercial vehicles demand durable components and scalable solutions. Fleet operators benefit from standardized installations and consistent driver experience.
Commercial backup camera systems support:
- Trucks and delivery vehicles
- Vans and service fleets
- Utility and municipal vehicles
- Specialty and custom builds
Explore options here at TadiBrothers
Maintaining Your Backup Camera System
Routine maintenance preserves image quality and system performance.
Maintenance best practices include:
- Cleaning the camera lens regularly
- Inspecting cable connections periodically
- Updating system settings when needed
- Verifying monitor clarity
Proper care extends the system’s lifespan and ensures dependable operation.
Professional Installation vs DIY Installation
DIY installation offers flexibility and cost control, while professional installation ensures precision and optimal configuration. The choice depends on vehicle complexity and system type.
Complex systems with multiple cameras benefit from professional expertise, while basic single-camera systems may suit experienced DIY installers.
Final Thoughts on Backup Camera Installation
A backup camera installation is an investment in safety, convenience, and confidence. When installed with precision, the system delivers clear visibility, reliable activation, and seamless integration with the vehicle.
By selecting the right components, following a structured installation process, and prioritizing quality at every stage, drivers achieve a solution that performs consistently in real-world conditions. Whether upgrading a personal car or equipping a commercial vehicle, a properly installed backup camera system enhances control and peace of mind every time reverse gear is engaged.
FAQs: Backup Camera for Car Installation
How long does it take to install a backup camera for a car?
A typical backup camera for car installation takes 1 to 3 hours, depending on vehicle type and system complexity. Single-camera systems install faster, while multi-camera or surround view systems require additional time for wiring and calibration.
Can I install a backup camera myself, or should I hire a professional?
We can install a backup camera ourselves if the system is basic and wiring access is straightforward. However, professional installation is recommended for vehicles with factory displays, advanced electronics, or multi-camera systems to ensure accuracy and long-term reliability.
Where is the best location to mount a backup camera?
The ideal mounting position is centered at the rear of the vehicle, usually above the license plate or within a rear trim panel. This placement provides balanced visibility and accurate distance perception while minimizing blind spots.
Can I upgrade from a single backup camera to a 360-degree system later?
Yes, many vehicles can be upgraded from a single rear camera to a multi-camera or 360-degree surround view system. These advanced systems provide full perimeter coverage and a bird’s-eye view, enhancing parking accuracy and driver awareness. Compatibility with the existing monitor and wiring should be confirmed before upgrading.
Do backup cameras connect to the reverse light for power?
Yes, most backup cameras draw power from the reverse light circuit, allowing the system to activate automatically when reverse gear is engaged. Proper grounding and insulated connections are essential to maintain a stable video signal.